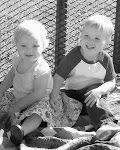
Wednesday, June 24, 2009

For Renee's Little Girls...

My sister, Renee, has three beautiful grand daughters. I decided they needed a sundress made by their Aunt Kimberly... so this is what I did this evening. Mady is the oldest at 18 months... She is very tall and slim for her age... she takes after her daddy. I made hers extra long for our little lady. Jocelyn is 7 months old and little Brinley is just 3 1/2 months old.

Hope they work out for the little cuties.

Wishing Everyone a Wonderful Wednesday!

This is the beautiful sunrise I awoke to this morning!
It is pretty awesome, when you consider it came after the violent thunderstorms we had last evening. How can you not have a great day when it starts off like this?

I just wanted to Wish Everyone Have a Wonderful Wednesday with me.

Tuesday, June 23, 2009

Sensational Summer Sundress Tutorial...

This is a quick and easy dress or shirt if you prefer. There is a picture step-by-step above... I'm sure more than you will need. If you're a seamstress, I'm sure the picture will do the trick. You might need the fabric measurements below. If you are new to sewing, If you can sew a straight seam, this dress is for you. No zippers or button holes required.

Fabric Measurements (for Size 18-24 mos)
Main fabric~
In center... 14 inches by WOF (Width of Fabric) ~ This piece will change depending on the length you need for your finished dress/summer shirt.
Straps... 2.5 inches by WOF divided into 4 equal pieces... folded in half length wise (this works for infant - 24 mos straps, for bigger sizes you might need to cut two strips and trim to appropriate length). Also, another option for the straps might be grosgrain ribbon ~ I would go with 5/8 inch to 1-1/2 inches.
Contrast fabric ~
Upper Casing... 4 inches by WOF folded in half length wise (right side out).
Lower Border... 8 inches by WOF folded in half length wise (right side out)... this creates the hem... very simple, very easy.
Elastic ~ Measure around your child's chest under the arms... or just hold it up and eyeball it... that's what I do... honest, seems to work fine.
Two buttons or add a bow or any little embellishment your heart desires.

Instructions:
We'll start with the straps if you are making from fabric. Fold in half right sides together. Serge along the length... I do all four in a row. Then serge across one end of each strap. Turn right side out. (I use a pen or pencil to help flip the fabric ~ start with the end for pushing the fabric up and then once done, flip over and use the point to fix the corners.) Press, press, press.

Now your ready for the body of the dress. Make sure if your fabric has a pattern, ie... up and down print, that you place the upper casing on the top... saves ripping out later. With the lengths together, serge 1/4 inch along the long edge. Press the serged seam towards the main body of the dress. Topstitch down the serged seam (I place the seam along the inside edge of my presser foot ~ works perfectly ~ see picture above), If you do not have a serger, you may choose to sew your seams, then use a decorative stitch to overlock the edges when doing your topstitching. Once done you are ready to make the seam for the casing... measure your elastic width. ( I use 1/2 inch - 5/8 inch elastic.) Make sure you allow for the elastic to move freely. Measure over from the seam where you attached to the main body of the dress approximately 1 inch... this will leave a edge on the top that create a ruffle much like sheared curtains.

Now we attach the lower border the same way. Once again, press the serged edge towards the body of the dress. Topstitch down for a nice finished effect.

Take your length of elastic, place a dress makers straight pin a cross one end. (This will keep the elastic from pulling all the way through as your feeding through the other side.) Use a large safety pin lengthwise on the elastic to help feed through the casing. Once all the way through, I pin the elastic in place about two inches in (This helps to keep the pins out of the way of the serger or presser foot.) Now you are ready to sew the short edges of your dress together. Lovely... now find the center of the front, line up with the center of the back. Measure out equal distances on each side... approx 2 inches and pin the straps in place... front and back. Sew across the strap, make sure to reinforce your seam for added strength. Sew at the seam between the elastic and the ruffled top edge. (this helps to hide the stitches)

Now you are ready to embellish to your hearts content... Everyone loves buttons and bows!

Enjoy!

Monday, June 22, 2009

While weeding my flower bed...

I couldn't help but snap a few pictures. Everything is beginning to look so pretty. This was just after the rain (which makes weeding soooo much easier) and everything looked so clean and pretty. Anywho, while weeding my flower bed I noticed my Honeysuckle had gotten out of control. So I snipped off some vines and made the cool wreath in the upper left hand shot. The basket in the bottom right shot is all planted with perennials and ready to go home to Miss Jenny Doan, aka Momma Doan, the winner of my give-away. Have a wonderful Monday!

Sunday, June 21, 2009

Butterflies a Flutter...

This finishes off the last of the little bucket hats I purchased... Of course I had to make dresses to match them... come on now.

Saturday, June 20, 2009

I Guess Maybe I've Been A Little Busy (CRAZY!)...

I didn't realize just how many dresses I've made Ashelyn since May... Oh, and a few accessories too. Funny thing is, there are two dresses missing from the above shot. The pink one I posted last night and the little blue dress she is wearing with her hair in piggy tails in her birthday post... kinda crazy. (I think that makes 12 ~ Does she have enough summer wear yet Misty?) I sure am having fun.

Oh, and you think maybe I have a thing for pink and purple? Just maybe.

This little dress I just finished is for my Pay It Forward project. It will be departing to reside with Miss Abbie. I sure hope I didn't make it too long. Misty says Abbie is a little taller then Ashelyn ~ so it hopefully will work.

Options...

What to do, what to do? Both will work... How cool is that!?! I fell in love with both of these fabrics and couldn't resist making one more dress with both. LOVE IT!!! Can one little girl have too many dresses? I sure don't think so, but I think I better stop for a little while.

In Her Easter Bonnet...

What??? Easter has come and gone you say.
Okay, so I'm a little late for Easter... But, I hadn't found these babies yet. I am pretty tickled with them. Gramma Doan, Do you recognize this fabric?
Too bad I didn't have this one completed for Sweetpea yesterday... oh well, she'll have them for the next time she wears her little dot to dot dress.
Three out of four little bonnets for my little lassie. Ashe is going to look pretty stylin' wearing these little pretties.
Thought the lamp made a very nice hat display. I might just have to Etsy some of these in the near future... Wouldn't even begin to know where to start on pricing... fun thought tho.

Friday, June 19, 2009

Pretty in Pink...

Momma always loved butterflies. I guess I am somewhat the same. I've always been drawn to beautiful butterflies. When I saw this pretty pink fabric a flutter with butterflies... I knew I had to make Ashelyn something with it. I found some vintage buttons that were from Brent's Grandma Bailey-Ketchem's stash of old, old buttons. I am so lucky to have this stash to rummage through whenever I need a neat center for a hat or embellishment. It makes it seem like Ashelyn's Great-Great Grandma is smiling down thinking... yup, I remember what those came from. Good times.
Here's a close up of the buttons and the pretty little hat.
And here are two more hat in the making to go with the dresses I finished earlier in the week. You can't tell very well from the picture, but one is a light blue and the other is lavender... I found these little gems at the Dollar Tree... yup, that would be $1.00 each, before embellishments. What a deal!!!

HAPPY, HAPPY BIRTHDAY BAY-BEE!!!

Gideon was so in love with his little sissy.
You were so tiny and new, he wanted you to hold his hand... and you did.
He even had a kiss ~ just for you.
We're all so happy it's your Birthday and can't wait to celebrate with you tomorrow.
ps... Grandma loves those little piggy tails... sooooo cute!
Just look at you... getting to be such a big girl...
All decked out and ready to go... Oops, where's your shoes?
Oh, and you need a bag.
Happy Birthday ~ Sweet Ashelyn!
Grandpa and Grandma love you and Bubba to pieces!

Some how I failed to wish my Niece, Jade, a Happy Birthday as well. Ashelyn, Jade and my grandfather, Howard Bruce McOsker, all share the same birthday. That is three generations in our family. I think that is pretty neat. I know Grandpa is smiling down at his girls. We love you Grandpa and Jadie~Poo.